 PL
PL

Unidoc is a mature and advanced business platform with Document Management System features, but organized as a Business Issue Tracking system.
Unidoc lets you configure all your company document and issue types from scratch. Everything is configurable here: organization structure, permissions, object types, status, forms and views.
Download Now Learn More
Everything required for effective management
Collect all company documents in any format from any source (such as emails or scanning devices) in a single place and share with your co-workers.
Send internal messages to groups (such as announcements) or particular people. Track the history of discussions about specific documents and issues.
Define your company documents (such as letterheads or offers) in the form of templates, and allow the system to generate them automatically for you.
Track your business issues (such as offers or complaints) and resources (such as devices or cars) in a simple unified environment.
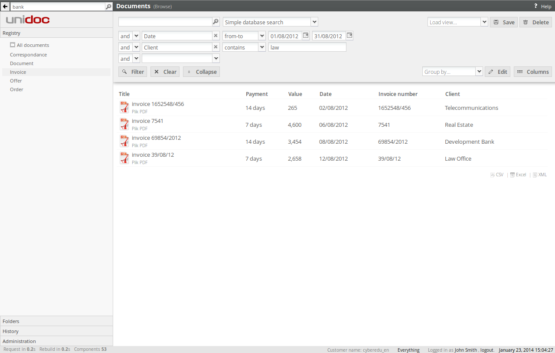
Create customized data views (such as expiring tenders) using flexible and unified registry views with advanced filtering features.
Forget about looking for the current version of a document. You can keep and edit them directly from a browser, using your favourite office suite.
Build a whole company contacts database with easy-to-use store and search features. Track the activities of your sales team.
You don't need to manually track events in the system. You will automatically be notified by email about all daily operational activities in your company.
Define you own report templates and automatically generate them from registry views. For example, outgoing and incoming correspondence books.
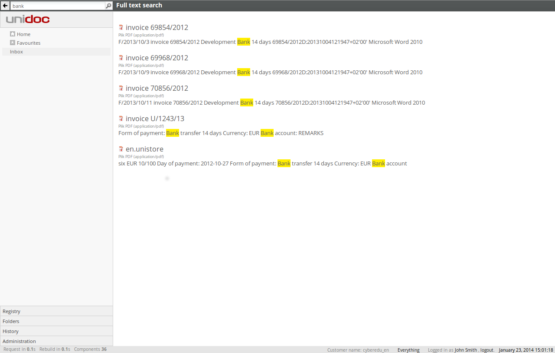
Search in everything, including the content of your documents, with a simple search field with google-like features.
Set reminders connected to particular documents, issues or resources. Receive notifications in advance of significant events.
Create virtual mailrooms to distribute correspondence in digital form. The system automatically stores every mail in an easily retrievable archive.
Easily delegate tasks and receive instant notification of the results. Assign tasks to your documents, business issues and resources. Track activities.
Use the management panel to assist your employees and keep your finger on the pulse. Browse the company activity history.
Define workflows connected with particular documents or business issues. Allow the system to execute them automatically.
Or use the free version
If you need more than 50 users please contact us.
* When you purchase our premium plan you get one year of professional support with a 48 hour SLA and 12 months of product updates. When this period ends you can still use Unidoc without limitations and additional cost. If you would like to extend professional support and product updates for another year you need to purchase a subscription extension.
We use Docker technology to enable fast installation in any operating system
Firstly, you need to install Docker. It can be done for Windows, Mac and Linux or supported cloud platforms.
To install Docker for your Mac, Linux or cloud platform please follow the instructions for your operating system from the Docker website.
To install Docker for your Windows system please navigate to Installation and run (Windows) tab of this instruction because Docker commands for Windows are slightly different.
Note, that all commands below you need to execute as a root, i.e. you need to use either sudo or su command.
Secondly, you need to download Unidoc image from our repository. This can be done with a single simple command:
$ docker pull unidoc/unidoc
Then, you need to wait for the download to be completed. Then you may check if everything is installed successfully:
$ docker images
REPOSITORY TAG IMAGE ID CREATED VIRTUAL SIZE
unidoc/unidoc latest 2309acea93c8 3 hours ago 1.165 GB
Now it's time to run the image for the first time and create a container. This can be done using another command (note that this step is required only once):
$ docker run -p 8080:8080 -p 8090:22 -t -i --name=unidoc unidoc/unidoc /bin/bash
After execution you should now be moved to a working Docker container. Then you can check if everything is OK, and then you must exit the container using the exit command:
root@23951e6e7d56:/# ls root
libreoffice unidoc unidoc-custom.sh unidoc-redeploy.sh unidoc-start.sh unidoc-stop.sh
root@23951e6e7d56:/# exit
exit
When you exit the console Docker exits the container and stops its execution. This is OK for now. Now check if the container is really stopped. This command shows all running containers:
$ docker ps
CONTAINER ID IMAGE COMMAND CREATED STATUS PORTS NAMES
Nothing should be working right now, but we can check if the container is still there. This command shows all Docker containers, including those stopped:
$ docker ps -a
CONTAINER ID IMAGE COMMAND CREATED STATUS PORTS NAMES
23951e6e7d56 unidoc/unidoc "/bin/bash" 7 minutes ago Exited (0) 7 minutes ago unidoc
The container is installed and its name is unidoc.
Having a container created you just need to start it:
$ docker start unidoc
When the container operating system has started it doesn't mean Unidoc has started. To start Unidoc you need to execute an additional command:
$ docker exec unidoc /root/unidoc-start.sh
The first time you execute the command a lot of magic happens. At this point the latest version of Unidoc is downloaded, so you need to ensure that you are connected to the internet. After everything is downloaded you will see the Unidoc logs on the screen. A typical installation should end with something like this:
INFO: Server startup in 39428 ms
You have now just installed and started your new Unidoc system. This system will be available on http://localhost:8080 (or through the network by IP or your host name). You can then log in to the user account created during initialization with login: admin and password: admin.
After starting Unidoc it sends its logs to your console. But you can disconnect this process and let Unidoc work in the background using CTRL+C.
To stop a working container we recommed the following method. Firstly, stop Unidoc itself:
$ docker exec unidoc /root/unidoc-stop.sh
Then stop the whole container:
$ docker stop unidoc
Firstly, you need to install Docker. It can be done for Windows, Mac and Linux or supported cloud platforms.
To install Docker for your Windows system please follow the instructions from the Docker website.
To install Docker for your Mac, Linux or cloud platform please navigate to Installation and run tab of this instruction because Docker commands for *nix operating systems are slightly different.
To execute all commands below we use Docker Quickstart Terminal. Please run this terminal from the desktop icon when the Docker installation is done.
Please make sure there are no antivirus warnings when you run Docker Quickstart Terminal. If you can see any antivirus warnings about running particular executable files required by Docker Quickstart Terminal (eg. that the specific executable file has been run in sandbox mode) please disable your antivirus for the Docker executable files.
Secondly, you need to download Unidoc image from our repository. This can be done with a single simple command:
$ docker pull unidoc/unidoc
Then, you need to wait for the download to be completed. Then you may check if everything is installed successfully:
$ docker images
REPOSITORY TAG IMAGE ID CREATED VIRTUAL SIZE
unidoc/unidoc latest 2309acea93c8 3 hours ago 1.165 GB
Now it's time to run the image for the first time and create a container. This can be done using another command (note that this step is required only once):
$ docker run -p 8080:8080 -p 8090:22 -t -i --name=unidoc unidoc/unidoc bash
After execution you should now be moved to a working Docker container. Then you can check if everything is OK, and then you must exit the container using the exit command:
root@23951e6e7d56:/# ls root
libreoffice unidoc unidoc-custom.sh unidoc-redeploy.sh unidoc-start.sh unidoc-stop.sh
root@23951e6e7d56:/# exit
exit
When you exit the console Docker exits the container and stops its execution. This is OK for now. Now check if the container is really stopped. This command shows all running containers:
$ docker ps
CONTAINER ID IMAGE COMMAND CREATED STATUS PORTS NAMES
Nothing should be working right now, but we can check if the container is still there. This command shows all Docker containers, including those stopped:
$ docker ps -a
CONTAINER ID IMAGE COMMAND CREATED STATUS PORTS NAMES
23951e6e7d56 unidoc/unidoc "/bin/bash" 7 minutes ago Exited (0) 7 minutes ago unidoc
The container is installed and its name is unidoc.
Having a container created you just need to start it:
$ docker start unidoc
When the container operating system has started it doesn't mean Unidoc has started. To start Unidoc you need to execute an additional command:
$ docker exec unidoc bash -c "exec /root/unidoc-start.sh"
The first time you execute the command a lot of magic happens. At this point the latest version of Unidoc is downloaded, so you need to ensure that you are connected to the internet. After everything is downloaded you will see the Unidoc logs on the screen. A typical installation should end with something like this:
INFO: Server startup in 39428 ms
You have now just installed and started your new Unidoc system. For now the system is available from your host on IP shown by the following command (by default it's: 192.168.99.100):
$ docker-machine ip default
Just enter http://192.168.99.100:8080 (or whatever else IP is shown by docker-machine command) in the browser. You can then log in to the user account created during initialization with login: admin and password: admin.
After starting Unidoc it sends its logs to your console. But you can disconnect this process and let Unidoc work in the background using CTRL+C. Afterwards, you can close the Docker terminal and Unidoc will be running in the background.
To stop a working container we recommed the following method. Firstly, stop Unidoc itself:
$ docker exec unidoc bash -c "exec /root/unidoc-stop.sh"
Then stop the whole container:
$ docker stop unidoc
Unidoc is accessible on 8080 port of your Docker IP address on Docker Virtual Network Interface. To make it available on http://localhost and accessible from the network please configure firewall rule forwarding 80 port of localhost to 8080 of Docker IP address.
We offer Unidoc customization on demand. In such instances you will receive a custom unidoc.war file containing the whole system. To deploy it you will need to have a newly initialized Unidoc container (ie. completed steps 1-2-3 from the installation instructions). Firstly, you will need to disable the automatic updates. Then, assuming you have a new container running, you will need to execute this command:
$ docker exec unidoc /root/unidoc-custom.sh enable
###########################################################################
# Unidoc custom version script
###########################################################################
Currently you use standard Unidoc version
###########################################################################
# Enabling custom Unidoc version
###########################################################################
Then you need to prepare your unidoc.war file and execute this command to install this file into the container. You should do this from the host directory where the unidoc.war file is located.
$ docker cp unidoc.war unidoc:/root/unidoc/war
Finally, you need to tell the container it should rebuild a new Unidoc version from the previously installed copy of the unidoc.war file:
$ docker exec unidoc /root/unidoc-redeploy.sh
You can now run your custom version the same as the standard one.
If you remember, when you first started the container you needed to use such a command:
$ docker run -p 8080:8080 -p 8090:22 -t -i --name=unidoc unidoc/unidoc /bin/bash
The first 8080 is a port where the Docker container network interface will be bound to the host system network interface. So, you need only change this port to 80:
$ docker run -p 80:8080 -p 8090:22 -t -i --name=unidoc unidoc/unidoc /bin/bash
Once again, let's look at the command we used to start the container for the first time:
$ docker run -p 8080:8080 -p 8090:22 -t -i --name=unidoc unidoc/unidoc /bin/bash
Unidoc container starts its own SSH server. It works internally in the container on port 22, and binds it to the host system network interface port 8090. To enter to the container shell you simply need to execute this command while Unidoc is running:
$ ssh -p 8090 root@localhost
The password you need to enter the container shell is automatically generated by Unidoc as a random string. Tt is always shown at the start:
###########################################################################
# Setting root password to: Doh0ooy6AF
###########################################################################
You need to expose port 8090 on the host machine visible in the internet, and send us the root password. If you don't need to manage the server externally, we advise you to keep this port closed in the host system firewall.
Here is a small snapshot of the Unidoc components and the directory layout: